2.2. Creating the Keyboard Input View
Now let's create the GUI. Use the New File Assistant once again to make a new view .xib resource, naming it RpnKeyboard. Open the RpnKeyboard.xib file in Interface Builder, select the File's Owner proxy icon, and use the identity inspector to set its class to InputView.
The .xib should already contain a UIView, which you should now open. If you created the .xib
file as an iPad resource (instead of an iPhone resource), it may be
preconfigured for full-screen usage. In that case, use the attribute
inspector to disable its status bar.
Now resize the view so that
it can accommodate the buttons we need. The view will be resized to the
correct iPad keyboard space before being displayed, so the exact size
isn't too important—anything around 500 by 250 pixels should be just
fine.
Use the attribute
inspector to set the view's background color to light gray by clicking
the color well for the background color, choosing the grayscale slider
in the color picker that appears, and selecting 75%. This will help
give your keyboard an appearance that's similar to the normal keyboard.
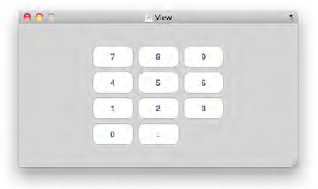
Now drag in a basic Round Rect
Button from the Library, and then control-drag from it to the File's
Owner icon, connecting it to the takeInputFromTitle: action. Then duplicate the button ten times with  D, and arrange the buttons as shown in Figure 9-6,
which also shows the titles you should set on each button. Let
Interface Builder help you define spacing between these buttons. There
should be a natural spot at which the buttons snap into place, 8 pixels
apart from each other.
D, and arrange the buttons as shown in Figure 9-6,
which also shows the titles you should set on each button. Let
Interface Builder help you define spacing between these buttons. There
should be a natural spot at which the buttons snap into place, 8 pixels
apart from each other.
Next, drag in another Round Rect Button from the Library, placing it to the right of the 9 button, and connect this one to the doTaggedAction:
method in File's Owner. To make the function buttons stand out a bit
from the numeric input buttons, use the attribute inspector to change
this button's Type from Rounded Rect to Custom, and set its background
color to something you like (I chose a slightly greenish blue).
Duplicate this button three times, and put the buttons in a column to
the right of the others, as shown in Figure 4. This figure also shows which mathematical symbol to use as the title for each button.

Remember that the action
method these buttons trigger looks at the sender's tag to see what it's
supposed to do, so we're going to give each button a tag matching its
function. Unfortunately, we can't use the tag names we defined as an
enumerated type in InputView's
header file (wouldn't that be sweet?). Instead, we need to use the
corresponding integers: 1 for division, 2 for multiplication, 3 for
subtraction, and 4 for addition. Open the attribute inspector, and then
select one button at a time, setting each tag value in turn.
The final set of buttons
will be the ones marked DEL and Enter on the left side. Select one of
the buttons you just made on the right, duplicate it twice, and drag
them both over to the left. Lay them out as shown in Figure 5, making the Enter button as tall as two normal buttons.

Change the Enter button's tag to 0
so that it activates the correct bit of functionality. Next, retarget
the DEL button by control-dragging from the button to the File's Owner
icon and selecting the doDelete:
action. At this point, the DEL button will actually be misconfigured. A
button click can trigger multiple action method calls, and setting a
new connection doesn't delete any of the old ones. To fix this, open
the connections inspector, where you can see the multiple actions that
are configured for the DEL button. Delete the connection to doTaggedAction: so we don't have a DEL button doing crazy things.
I mentioned earlier that the
view we create here will be resized automatically to the correct iPad
keyboard size. Let's take control of how the resizing affects our
buttons, making sure that the entire button group will remain a
constant size and centered in the overall view.
Use the mouse to drag a rectangle across all 17 buttons, so that they're all highlighted, and then select Layout => Embed Objects In => View
from the menu. With the new view selected, open the size inspector. To
make sure this enclosing view remains centered, click to turn off all
the red arrows and bars in the Autosizing section.
The special input view is now complete! Save your work, and then switch back to Xcode.